Ambilight Monitor

A cool design as the background lights change with the content of the monitor and makes the audience feel more immersed.

About the Project

There is a similar project called “Adalight Project Pack”. It provides some kits to DIY a Ambilight. It means my project was doable. However, the Adafruit kit uses lots of individual LED bulbs mounting behind the monitor, which is costly and messy. Using LED strips may be a better choice.

Circuit Design

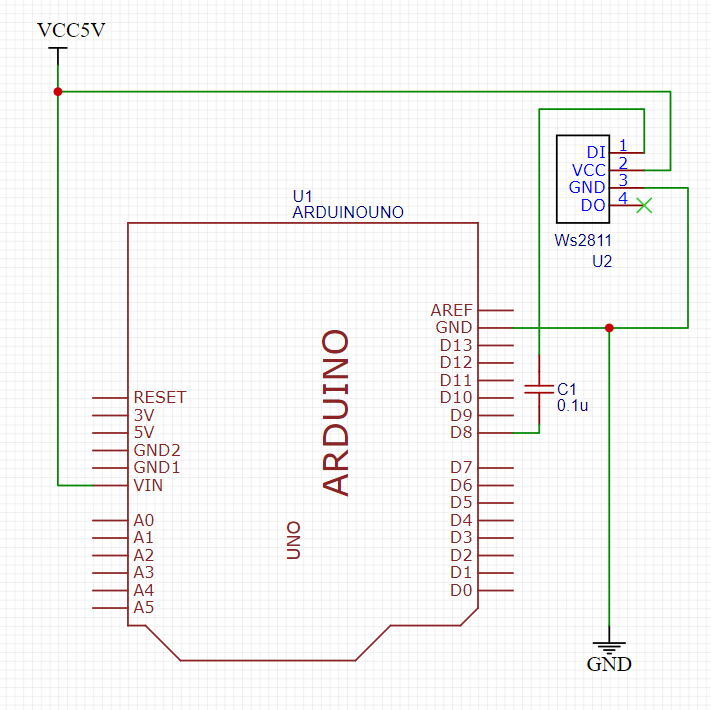
Each LED will consume about 20mA. I have 40 LEDs in my design so 800mA is needed. The maximum current to draw from an Arduino pin is 500mA (without external power) and 1A (with external power). To simplify the circuit I decided to connect LED strips directly to Arduino pins, so I have to use the external power to feed the Arduino. Make sure to set a common ground properly.

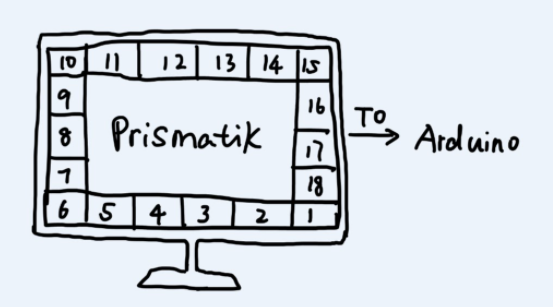
Wire the LED strips and connect them to Arduino. I found a useful software called Prismatik. It will divide the edge of the screen into several small blocks according to the LED layout, measure the average RGB value, and send it to Arduino through the USB port. Arduino will control each LED accordingly by serial communication with the help of the FastLED library.

Code

The LEDs are controlled by FastLED library.

“FastLED is a fast, efficient, easy-to-use Arduino library for programming addressable LED strips and pixels such as WS2810, WS2811, LPD8806, Neopixel and more. FastLED is used by thousands of developers, in countless art and hobby projects, and in numerous commercial products” –From http://fastled.io/

This is a sample code for Arduino from the Internet. There is also a similar code from Adafruit on Github.

1
2
3
4
5
6
7
8
9
10
11
12
13
14
15
16
17
18
19
20
21
22
23
24
25
26
27
28
29
30
31
32
33
34
35
36
37
38
39
40
41
42
43
44
45
46
47
48
49
50
51
52
53
54
55
56
57
58
59
60
61
62
63
64
65
66
67
68
69
70
71
72
73
74
75
76
77
78
79
80
81
82
83
84
85
86
87
88
89
90
91
92
93
94
95
96
97
98
99
100
101
102
103
104
105
106
107
108
109
110
111
112
113
114
115
116
117
118
119
120
121
122
123
124
125
126
127
128
129
130
131
#include "FastLED.h"

#define NUM_LEDS 38
#define LED_DATA_PIN 3
#define NUM_BYTES (NUM_LEDS*3) // 3 colors

#define BRIGHTNESS 100
#define UPDATES_PER_SECOND 100

#define TIMEOUT 3000

#define MODE_ANIMATION 0
#define MODE_AMBILIGHT 1
uint8_t mode = MODE_ANIMATION;

byte MESSAGE_PREAMBLE[] = { 0x00, 0x01, 0x02, 0x03, 0x04, 0x05, 0x06, 0x07, 0x08, 0x09 };
uint8_t PREAMBLE_LENGTH = 10;
uint8_t current_preamble_position = 0;

unsigned long last_serial_available = -1L;

uint8_t led_counter = 0;
uint8_t byte_counter = 0;

CRGB leds[NUM_LEDS];
byte buffer[NUM_BYTES];

// Filler animation attributes
CRGBPalette16 currentPalette = RainbowColors_p;
TBlendType currentBlending = LINEARBLEND;
uint8_t startIndex = 0;

void setup()
{
Serial.begin(115200);
FastLED.clear(true);
FastLED.addLeds<WS2811, LED_DATA_PIN, GRB>(leds, NUM_LEDS);
FastLED.setBrightness(BRIGHTNESS);
}

void loop()
{
switch (mode) {
case MODE_ANIMATION:
fillLEDsFromPaletteColors();
break;

case MODE_AMBILIGHT:
processIncomingData();
break;
}

}

void processIncomingData()
{
if (waitForPreamble(TIMEOUT))
{
Serial.readBytes(buffer, NUM_BYTES);

/* DEBUG
for (int i = 0; i < NUM_BYTES; i++)
{
Serial.write((char)buffer[i]);
}
*/

while (byte_counter < NUM_BYTES)
{
byte green = buffer[byte_counter++];
byte blue = buffer[byte_counter++];
byte red = buffer[byte_counter++];

leds[led_counter++] = CRGB(red, green, blue);
}

FastLED.show();

byte_counter = 0;
led_counter = 0;
}
else
{
mode = MODE_ANIMATION;
}
}

bool waitForPreamble(int timeout)
{
last_serial_available = millis();
while (current_preamble_position < PREAMBLE_LENGTH)
{
if (Serial.available() > 0)
{
last_serial_available = millis();

if (Serial.read() == MESSAGE_PREAMBLE[current_preamble_position])
{
current_preamble_position++;
}
else
{
current_preamble_position = 0;
}
}

if (millis() - last_serial_available > timeout)
{
return false;
}
}
current_preamble_position = 0;
return true;
}

void fillLEDsFromPaletteColors()
{
startIndex++; // speed

uint8_t colorIndex = startIndex;
for( int i = 0; i < NUM_LEDS; i++) {
leds[i] = ColorFromPalette(currentPalette, colorIndex, BRIGHTNESS, currentBlending);
colorIndex += 3;
}

FastLED.delay(1000 / UPDATES_PER_SECOND);

if (Serial.available() > 0)
{
mode = MODE_AMBILIGHT;
}

Prismatik

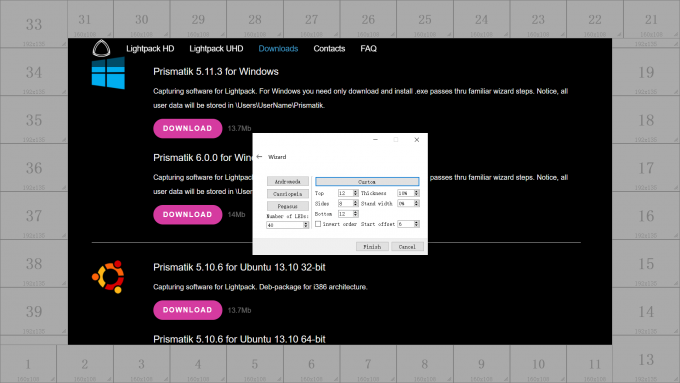
Prismatik samples the screen at a certain rate and send the data to Arduino through USB port. It also provides a friendly setup wizard to set the layout of the LEDs.

Prismatik

Setting the Prismatik

1 Selecting the correct LED type, serial communication port, and the Baud rate.

2 Setting the correct LED layout according to the wiring.


Ambilight Monitor
http://alexhcgu.github.io/2021/11/03/am/
Author
Alex Gu
Posted on
November 3, 2021
Licensed under